How Do You Style Product Photos?
When you’ve just started out budgets can be tight, so it’s tempting to think you’ll save some money by styling your own product photo shoot. But styling your own photos isn’t just about buying props - even though that can be fun too! It’s thinking about the story you want your products and brand to tell.
Here’s my top five product photography styling tips for independent makers, designers and online shops.

1. Plan your product photography styling
Before you plan your styling for your product photo shoot, you first need to think about your overall brand story including your brand values. To help my clients get started, I spend some time discussing things like:
What makes your product stand out from your competitors?
What are the words you’d use to describe your brand?
Why have you chosen a particular colour for your products?
Once you’ve found a style that works for you and your products, try to stick to it. This will help your customers recognise you and your products. Think, consistency = clear purpose and direction = positive messages to your customers. Creating consistent images that align to your brand values (your why) will help you build your brand story (who you’ve chosen to be). And most importantly, be confident in your styling ideas. Building your own brand style will help YOU and your lovely products stand out.
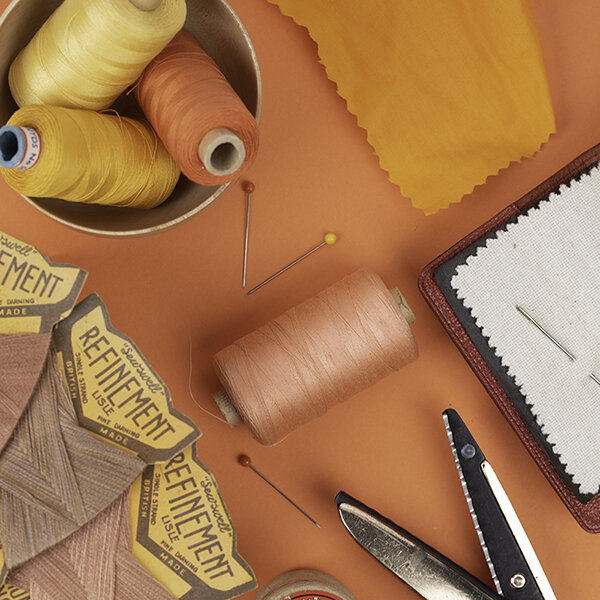
2. Using props in your styled product photography
The job of a professional product photographer is to deliver high quality images that are creative AND deliver the right messages about your brand. One of the ways to help tell the story of your brand is to choose the right props. Take a look around your home or studio and think about which tools you frequently use to make your products. It’s a great way to show scale as well as giving your customers an idea about how your products were made. Think about how your products make your customers FEEL. And try showing more than one product in a shot: if they like your product, they’ll love seeing a whole range.

3. Using colour in your styled product photos
A coloured surface, such as a wall, table top, fabric, card or shelf is great to use as a background to photograph your products. If you’re unsure of which colours would best suit your products, find a paint chart that includes the colour/s of your products and use it to select similar colours of the same shade. Or if you want your products to make an impact and stand out, experiment with opposite colours. Delicate pastel shades will create a soft, dreamy effect whereas strong colours create a bold statement. If you’re unsure, stick to natural backgrounds as they suit every product type.

4. Composition, cropping and framing
Composition, cropping, framing and selecting are all decisions about what to leave out of your photo. You can isolate your product within the image by using a shallow depth of field (blurry background/large aperture). This keeps the overall look of the photograph quite soft and gentle as well as giving you the option of focusing on one product. Whereas using a greater depth of field (background sharp/small aperture) will keep all your products in focus. – This is useful for when you need to group your products together in the shot. It’s important to shoot your product from all angles to display the most interesting features. As even though YOU really know your product inside out, your customers don’t!
Try out different positions of your product and try and leave space at the top of the image as this will make your customers feel like your product is right in front of them. A professional product photographer will be able to make decisions about composition, cropping, framing and selecting to ensure you get all the high quality photos you need.

5. Lighting your styled product photos
The simple rule of lighting is to remember that any light source whether artificial or daylight can be harsh and create hard shadows, loss of detail and glare. This can be used creatively, but for more control, the light source needs to be diffused by clouds or white fabric.
If you don’t have enough natural light for your product photographs, a reflector is a good option. A reflector or reflective surface will bounce the light from the main light source on to your product.
A professional product photographer will be able to advise you on whether natural or artificial light should be used for your products. They will have a set of professional lights and will know whether to use a diffuser or reflector (or both!) to create a set of consistent high-quality images of your products.

To round up
Developing your brand style takes time.
To help you get started try and find images of products that you’ve been inspired to buy and start to look at how they’ve styled the photos. Ask yourself:
What were you drawn to?
How have they used colour and props?
How does the photograph make you feel?
Once you’ve found a style that works for you and your products, try to stick to it.
If you need some inspiration to get you started, take a look at my portfolio.
A good professional product photographer will work with you on your brand style. If you’d like to talk about styling your next product photo shoot, then I’d love to hear from you.